# Install nginx ingress on Kubernetes
# Digital Ocean Kubernetes Service (DOKS)
🗓 February 01, 2020 | 👱 By: Hugh
Welcome to part 2 of my multi part series on setting up a scalable Wordpress server on Kubernetes. In this particular case I'm using Digital Ocean's Kubernetes Service (DOKS), and installing nginx-ingress using Helm.
I assume you have installed kubectl and doctl, as they were used in the previous part. If you haven't installed Helm then get the latest version by following the official instructions here as they are fairly straight forward.
What is an Ingress?
It took me a while to understand what an Ingress actually is. Part of the confusion for me was that it seemed to be very similar to a service of type LoadBalancer, but by default it isn't included with Kubernetes so you have to install it separately, and is needed in addition to the service definition. So what benefit does it provide?
There are two main benefits that come to mind. One is that creating a service of type LoadBalancer on DOKS or GKE will create a Load Balancer for each and every service. If you host 3 websites in your cluster then you will end up with 3 Load Balancers. This might not be an issue if you're made of money, but personally I'd rather keep the extra $20 a month.
The second benefit is integration with other tools, nginx-ingress for example integrates with a tool called cert-manager (I'll write about it in a future post) that will automatically generate and renew TLS certificates for your domains.
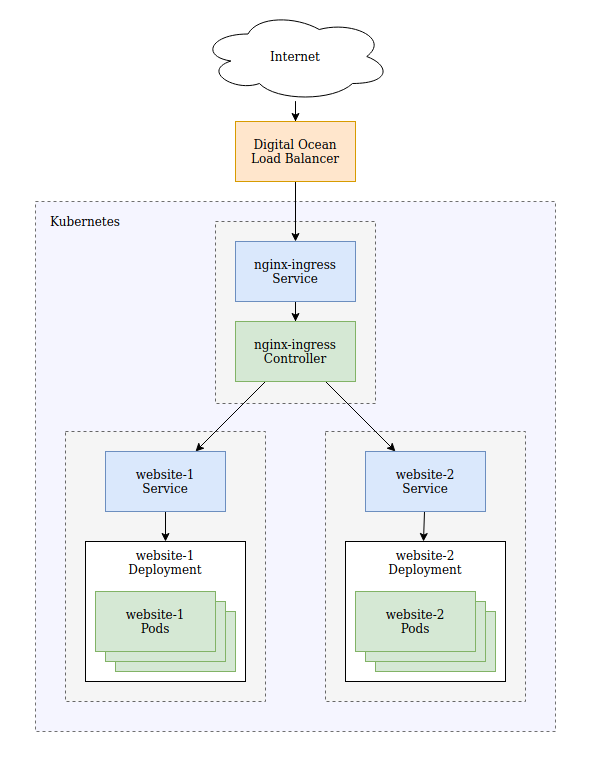
When you deploy nginx-ingress, you'll actually find that a LoadBalancer service is created that feeds traffic to the nginx-ingress controller, this acts much like a reverse proxy normally would and forwards traffic to the appropriate internal service.
Create you cluster
In the previous part, we set up our cluster using the web interface, this time we'll use doctl to do it, this has the added advantage of automatically setting up our kubectl keys. We'll use a minimal cluster again with a single node, run the following command to create a cluster in San Francisco:
doctl kubernetes cluster create my-test-cluster --auto-upgrade --count 1 --region sfo2
If you want to see the character code for all the available regions, run this:
doctl kubernetes options regions
The output when writing this was:
Slug    Name
nyc1    New York 1
sgp1    Singapore 1
lon1    London 1
nyc3    New York 3
ams3    Amsterdam 3
fra1    Frankfurt 1
tor1    Toronto 1
sfo2    San Francisco 2
blr1    Bangalore 1
It takes a little while to spin up, so in the mean time, we'll detour to learn a little bit about namespaces.
A bit about namespaces
In the diagram above you might have notices that there are three boxes with a dotted outline and grey background. This helps to understand the structure of the diagram, but also represents the way that I would split the setup into namespaces.
A namespace is a way to provide separation between applications in your cluster that helps provide isolation between applications as well as prevent naming conflicts. If I'm working namespace A and decide to make a service called database-service and my colleague is working in namespace B and decides to make a service called database-service then there won't be any conflicts. If we were both creating them in the default namespace we'd run in to issues.
Additionally, in terms of security, I only want my web server talking to my database. It is easier to block everything except namespace A than to maintain a list of allowed deployments.
So, when we setup nginx-ingress, and our web application, we will include namespace definitions.
Install nginx-ingress
Hopefully your cluster is now running. Run kubectl config get-contexts to make sure kubectl is connected to your new cluster.
We will use Helm to install nginx-ingress as it is the easiest way to do so on DOKS. GCP and AWS have slightly more complicated installation instructions that you can find here. They also have Helm instructions but they are (or at least were) out of date at the time I am writing this. Firstly because they use Helm 2 and secondly they don't apply a namespace.
So, to install it, first create a namespace for it to live in:
kubectl create namespace nginx-ingress
Then run the following Helm command:
helm install nginx-ingress stable/nginx-ingress --namespace nginx-ingress --set rbac.create=true
This will deploy a Helm chart and call it nginx-ingress, using the stable/nginx-ingress chart, in the freshly created nginx-ingress namespace. The output gives a bunch of useful information including a template for defining an Ingress:
apiVersion: extensions/v1beta1
kind: Ingress
metadata:
  annotations:
    kubernetes.io/ingress.class: nginx
  name: example
  namespace: foo
spec:
  rules:
    - host: www.example.com
      http:
        paths:
          - backend:
              serviceName: exampleService
              servicePort: 80
            path: /
As well as the following command that will help you figure out the IP address of your Load Balancer.
kubectl --namespace nginx-ingress get services -o wide -w nginx-ingress-controller
Get the external IP from the output of that command, or find the load balancer in the web UI.
NAME                       TYPE           CLUSTER-IP       EXTERNAL-IP       PORT(S)                      AGE   SELECTOR
nginx-ingress-controller   LoadBalancer   10.245.215.198   165.227.231.154   80:31319/TCP,443:30457/TCP   35m   app=nginx-ingress,component=controller,release=nginx-ingress
That should be it! Have a look at what is there if you are interested, run a few commands and see if you can identify the service and controller, e.g.:
kubectl get services -n nginx-ingress
kubectl get deployments -n nginx-ingress
kubectl get pods -n nginx-ingress
Remember that a service directs traffic to a deployment, the deployment describes an application, including ports to expose and container images and replica count. Kubernetes takes that deployment description and creates, destroys and recreates pods as required to meet the deployment specification.
The nginx-ingress-default-backend you'll see is a default handler that will serve any requests that don't get sent to another service.
Setup a sample app
Like the last tutorial, we'll base our application of the doks-example here. Create a manifest.yaml that describes our web server as follows:
---
kind: Namespace
apiVersion: v1
metadata:
  name: website-1
  labels:
    name: website-1
---
apiVersion: extensions/v1beta1
kind: Ingress
metadata:
  annotations:
    kubernetes.io/ingress.class: nginx
  name: doks-example
  namespace: website-1
spec:
  rules:
    - host: sample-app.goruncode.com
      http:
        paths:
          - backend:
              serviceName: doks-example
              servicePort: 80
            path: /
---
kind: Service
apiVersion: v1
metadata:
  name: doks-example
  namespace: website-1
spec:
  type: ClusterIP
  selector:
    app: doks-example
  ports:
    - name: http
      protocol: TCP
      port: 80
      targetPort: 80
---
apiVersion: apps/v1
kind: Deployment
metadata:
  name: doks-example
  namespace: website-1
spec:
  replicas: 2
  selector:
    matchLabels:
      app: doks-example
  template:
    metadata:
      labels:
        app: doks-example
    spec:
      containers:
      - name: nginx
        image: digitalocean/doks-example
        ports:
        - containerPort: 80
          protocol: TCP
The key differences between this one and the one from the previous tutorial are the addition of namespaces, the addition of the Ingress definition, and switching the service type from LoadBalancer to ClusterIP.
The namespace definition is fairly straight forward, as is the addition of the lines that assign each object to the new namespace.
The Ingress is a little bit new though, but is taken almost directly from the sample output when nginx-ingress was installed. It uses host based routing to send any request to http://sample-app.goruncode.com to our doks-example service on port 80. From there it gets passed to our deployment.
The path parameter can be used to direct a specific path to a different service. For example, you might have an API service that is accessed on paths starting with /api. Likewise, you can set a different host name to be forwarded to a different service.
Finally, the service no longer needs an external load balancer, as the traffic is routed through the nginx-ingress. All that is required is that it be a routable within the cluster, so ClusterIP is the logical choice.
Updating your DNS
You'll no longer be able to access the page using the IP address as you were in the previous tutorial. The ingress will only pass requests that have the correct host specified to the web server. There are a few options to deal with this:
- Use a domain that you control the DNS records of and add the IP as an A record for the domain you specified.
- Use curl and fake the host name:
curl -H "Host: sample-app.goruncode.com" 165.227.231.154 - Change your hosts file to direct the domain to your IP.
Monitoring requests
If you'd like to monitor your requests coming in, you can look at the logs on the nginx controller. First get the pod name:
$ kubectl get pods -n nginx-ingress
NAME                                             READY   STATUS    RESTARTS   AGE
nginx-ingress-controller-5db4e35367-mlqye        1/1     Running   0          19h
nginx-ingress-default-backend-672ce461da-tzy3r   1/1     Running   0          19h
You can then use kubectl to follow the logs:
kubectl logs -f nginx-ingress-controller-5db4e35367-mlqye -n nginx-ingress
Refresh the page a few times and you'll see your requests coming in, along with some information on the service it gets passed to.
Similarly, if you look at the logs for the doks-example pods, you'll see the requests reaching them as well. Note that this deployment has 2 pods so requests could be routed to the other instance.
What next?
Wow, that was a fair bit to write down, hopefully it wasn't too much to read. If you're wondering what else to try:
- Add a different website with a different hostname.
- Route different paths to different services.
- Add basic HTTP authentication to a service.
To help, look at the nginx User Guide and Examples for pointers.
Conclusion
Enjoy your new found powers, don't forget to shut everything down if you don't want it running permanently. Coming up next will be adding TLS to your site so those basic auth credentials aren't sent in the clear for everyone to read!